MEDICALLY REVIEWED BY

Zola Zhang, MD, IBCLC, Breast Surgeon, Mother
Chirurgienne du sein | Consultante en lactation certifiée IBCLC | Mère Chirurgienne du sein dévouée et consultante en lactation certifiée IBCLC forte de 21 ans d'expérience clinique, mon travail prend racine à la fois dans l'expertise médicale et dans la réalité vécue de la maternité. Plus qu'une clinicienne, je suis une mère qui a allaité exclusivement son propre enfant pendant deux ans. Cette double perspective imprègne chacune de mes interactions, me permettant de conjuguer la rigueur scientifique à une empathie profonde face aux joies et aux défis de l'allaitement. Remarque : le texte original (en anglais) a été révisé par des experts ; le présent texte est une traduction en français de cette version.
Families with twin newborns can begin with one well-placed diaper pail—provided they can empty it before it becomes crowded or unpleasant to live with. A second pail may be useful when diaper changes happen regularly in two locations, such as the nursery and a bedroom used for overnight care, or when walking to the main pail disrupts an already busy routine.
Twin newborns typically go through an estimated 20 to 24 diapers per day combined during the first month. That is a lot of disposal volume, but it does not automatically mean you need two pails. The better question is whether one disposal point fits your home, your changing stations, and the frequency with which you are comfortable taking out the trash.
Test Whether One Pail Fits Your Routine
Start by looking at a pail’s stated diaper capacity, then compare it with your twins’ likely daily output.

For example, a pail rated for up to 60 newborn diapers could theoretically hold about 2.5 to 3 days of diapers for twins using 20 to 24 diapers a day. That is capacity math—not a recommendation to leave diapers in the pail for three days.
Real-world capacity can differ depending on how diapers are positioned in the bag. Instructions for one pail recommend rolling diapers before disposal to maximize bag space, but actual fit depends on diaper size and packing.
A one-pail setup is usually a practical starting point when the primary changing table is in one room, caregivers can reach the pail without stepping away from the changing area, and emptying it every day or as needed feels manageable.
One pail may be less practical when it routinely fills faster than your preferred emptying schedule, when a caregiver is carrying used diapers across the home several times a day, or when the pail is frequently left open or overflowing because it is inconveniently located.
The key distinction: a pail’s advertised capacity tells you how much it may hold. Your household’s comfort level determines when it should be emptied.
Put Disposal Where Changes Actually Happen
Twin care often works better with more than one stocked changing station. A nursery table may handle most daytime changes, while a bedroom, living room, or another floor becomes the practical spot for overnight or caregiver shifts.

A pail beside the changing table can eliminate trips to a distant household bin during a change. But every changing station does not need its own dedicated diaper pail.
One Nursery Station
Use one pail beside the primary changing area when nearly all changes happen there. This is the simplest arrangement: one liner system, one cleaning routine, and one place to monitor for fullness.
Keep diapers, wipes, a changing pad, and a spare outfit within reach so the disposal point supports the rest of the station rather than creating another task.
Two Regular Changing Stations
Consider two pails when two stations are used every day. Common examples include:
- A nursery station for daytime changes and a bedroom station for overnight care
- Changing areas on separate floors
- A shared-care arrangement where different caregivers consistently use different rooms
In this setup, assign each pail by location rather than by baby. Keeping “one pail per twin” rarely solves a real problem unless the babies are consistently changed in separate spaces. Location-based assignments make it easier for any caregiver to follow the same routine.
A Lower-Cost Secondary Option
If the second changing station is used only occasionally, a small covered trash container emptied promptly can be enough. This can be a sensible compromise for a compact home, a temporary overnight station, or a room where a dedicated pail would mostly sit unused.
A second pail is worth buying when it removes repeated friction—not simply because there are two babies. General guidance also notes that another pail can be useful when many changes happen outside the primary location, but that decision should follow your actual routine rather than a blanket rule.
Choose for Throughput, Not Just Capacity
With twins, the best features are the ones that make repeated disposal and bag changes easier. Before focusing on a particular style or finish, prioritize the parts of a pail you will use many times each day.

Prioritize Easy Everyday Use
Look for a design that is straightforward for every caregiver in the home to operate and empty. Features commonly considered useful include:
- Hands-free operation
- Automatic closing
- A childproof lock
- Easy bag changes
- Double-seal odor control
- Non-porous materials
These features do not guarantee identical odor control from one pail to another. Instead, they help you assess whether the pail suits your household’s handling and cleaning routine.
An easy bag-change system can matter when a pail fills quickly and one caregiver is handling both newborn care and household tasks.
Compare Liner Systems Before You Commit
Liners are an ongoing operating decision, not a minor detail. Some pails require proprietary refill bags, while others accept standard trash bags.
A pail that officially supports ordinary trash bags can avoid mandatory proprietary-refill purchases, though bag fit and performance vary by model. Check the manufacturer’s current instructions before assuming your usual kitchen bags will work.
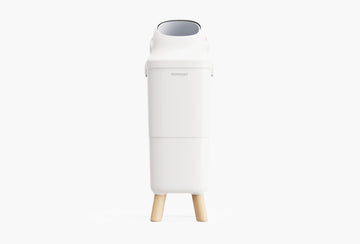
For example, the Momcozy Triple-Seal Diaper Pail product specifications list compatibility with standard 13-gallon trash bags, along with a hands-free wide opening, child safety lock, clear lid, and clamp bag seal. Those are product-specific specifications, not a claim that it will perform the same way as every other diaper pail.
Before choosing any system, ask:
- Can we reliably buy the compatible bags?
- Are we comfortable with the recurring refill cost, if required?
- Is the bag-change process easy enough for tired caregivers?
- Does the pail fit beside the changing station without obstructing movement?
- Can we follow its cleaning and lock instructions consistently?
Set an Emptying Rule Before You Need One
A twin pail setup works best when the household decides in advance what triggers an emptying run. Do not rely only on a maximum diaper count.
Your rule might be to empty the pail at the end of each day, when the bag approaches its practical limit, or whenever the stored diapers become bothersome for your household. If caregivers repeatedly postpone emptying because the pail is too far away, too hard to open, or awkward to reline, the setup needs adjustment.
For two-pail homes, keep the rule simple. For example, the primary nursery pail may be checked daily, while a smaller overnight bin is emptied each morning. The goal is consistency, not making both pails fill at the same rate.
Keep the Disposal Step Part of a Safe Changing Routine
A diaper pail contains waste; it does not replace careful hand hygiene or cleaning of the changing space.
After a diaper change:
- Place used wipes inside the soiled diaper before discarding it.
- Dispose of the diaper promptly in the pail or covered bin.
- Clean and disinfect the changing surface as appropriate for its material and the disinfectant label.
- Wash hands thoroughly with soap and water.
- Keep soiled clothing away from surfaces that cannot be easily cleaned, and securely bag it.
These steps are adapted from CDC diaper-changing guidance for childcare settings. At home, follow the product instructions for your changing surface, disinfectant, pail, liner, and any locking mechanism.
If older siblings visit the changing area, choose a placement that limits access and use the pail’s child-safety feature if it has one. Keep the pail stable and easy for adults to reach without turning diaper disposal into a balancing act during a change.
Start with the setup that lets you contain diapers safely and empty them before crowding or odor becomes a problem. Add a second pail when separate changing locations or an unsustainable emptying routine create friction—and use a simple changing-station checklist so every caregiver can follow the same plan.